Ruthanne has been blogging since early 2008. It’s like the chocolate to her peanut butter, the Grande to her Caramel Macchiato ~ it just fits and feels right. She’s passionate about her Lord, her husband and her children. When she’s not homeschooling her rowdy crew, she enjoys photography, good literature, baking, and really good coffee. You can find her blogging at Eclectic Whatnot where she shares a few random thoughts and loads of pictures.

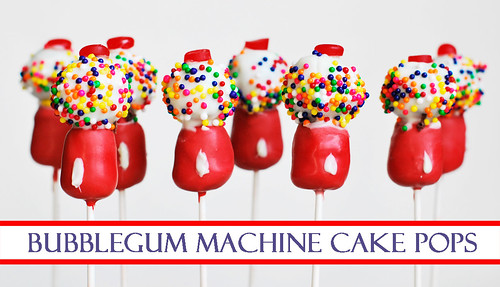
It was about this same time last year that I stumbled upon Bakerella’s site and absolutely fell in love with her cake pops. I was a little intimidated at first, but soon learned they were one of the easiest treats to make and my children loved them!
Ever since, I’ve tried to come up with new and creative ways to make them. My most recent venture being the Bubblegum Machine Cake Pops. My children told me they looked like baby rattles and ice cream cones {have any of you ever seen a red ice cream cone?!}, but with the help of some smart bloggy friends I figured out it was their way of getting me to make more. More practice equals more treats for them. Such smart children I’ve raised. 😉

Items you’ll need:
(A) Sprinkles ~ I used jumbo sprinkles, but I’m not sure they were necessary. Any kind of sprinkles will work.
(B) Dots ~ I sorted out the reds. You won’t need all that many of these. You could also used red m&ms, as well.
(C) Red Candy Melts
(D) White Candy Melts
(E) Bag of Lollipop Sticks
Not Pictured:
(F) Rectangular block of Styrofoam – usually found in the floral section of your local Wal-mart.
(G) One 9″ x 13″ cake.
(H) One can cream cheese frosting. {Not the whipped kind.}
First things first, bake your cake. You can bake one from scratch or doctor up a mix. Allow the cake to cool completely.
Thoroughly crumble the cake into a large mixing bowl.
Stir in your frosting until everything is combined. You can use homemade frosting here, I’m just not sure exactly how much to tell you to add. Maybe two cups?
Cover two baking sheets with wax paper.
Using my 1 tablespoon scoop from Pampered Chef, I scoop out a rounded ball and plop onto the baking sheet. Don’t worry about shaping them at this point. Rotate between the two baking sheets, making sure you have equal cake balls on each.
Place the cookie sheets into the freezer for about 15 minutes.
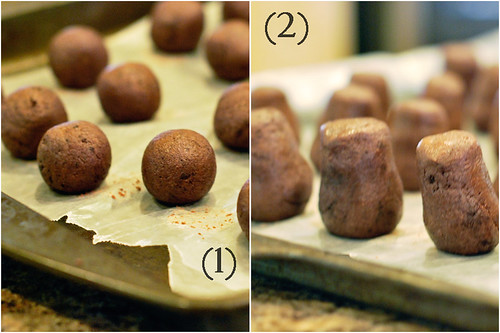
(1) Take out one cookie sheet. Roll each cake ball in the palm of your hand, shaping it into a nice, smooth ball. Place the cookie sheet back into the freezer.
(2) Take out the other cookie sheet. Do the same with each cake ball, except after you form a smooth ball, begin to shape it as it’s picture above. Perfection is not required here. Simply roll it in between your hands, elongating it slightly, making sure the bottom is wider than the top. Flatten the top and bottom. Place the cookie sheet back into the freezer.
For the rest of this, I place several sheets of wax paper on top of the counter to make clean-up easier.
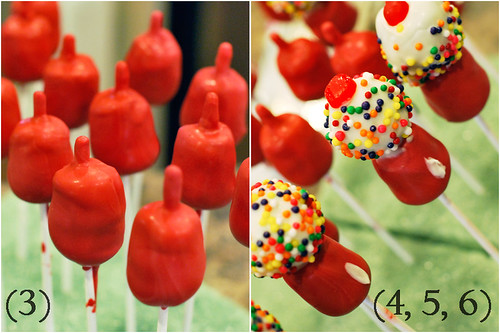
(3) Open the package of red candy melts, place in a microwavable bowl {one that is deep enough to dip the cake balls into} and melt on half power in the microwave. Stirring frequently.
Take out the bottom pieces for the cake pop from the freezer.
Dip a lollipop stick about 1″ into the candy melt. Slide one of the bottom pieces onto the stick, leaving about 1/2″ or so at the top of the stick {as pictured above}, and dip again into the candy melt making sure to cover the piece entirely. Push the stick into your Styrofoam block.
Repeat this until all bottom pieces are used up. You may need to melt more candy melts during this process and stick the bottom pieces back into the freezer to keep them firm.
(4, 5 & 6) Open the package of white candy melts and repeat the melting process you did with the red candy melts.
Pour the sprinkles into a shallow dish and set beside the white candy melt.
Cut the red Dots into thirds, width-wise.
Grab a toothpick and set aside.
Take the other cookie sheet with the smooth, rounded cake balls out of the freezer. Dip the tip of one of the lollipop sticks into the white candy melt, slide a cake ball on top, flush against the bottom piece and dip into the candy melt again making sure to cover the cake ball entirely.
Gently knock off any excess candy melt. Holding the lollipop stick sideways over your bowl of sprinkles, quickly sprinkle the cake ball with sprinkles while rotating the lollipop stick in your hand.
Push the lollipop stick back into the Styrofoam.
Take one of your cut Dots and dip one side into the candy melt. Place on top of the cake ball.
Take your toothpick you set aside, dip it into the white candy melt and smear some on the front of the bottom piece ~ to look like the dispenser.
Repeat these steps until all the cake balls are used up.
Price Break-down:
Cake mix: $1.00 {on sale}
Can of frosting: $0.50 {on sale}
2 bags of candy melt: $5.98
Lollipop sticks: $1.99
Box of Dots candy: $1.00
Sprinkles: FREE {already on hand}
Styrofoam: $0.50 {Originally, it cost around $6, but I’ve used it a dozen times.}
Total: $10.97
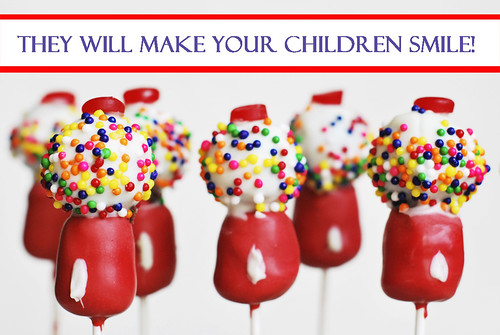
This makes about 25 cake pops, so each cake pop would cost under $0.50. Cheaper than your average candy bar and way more fun to eat!
This post is linking to A Soft Place. Find more recipes at Tasty Tuesday.


Jen@balancing Beauty and Bedlam says
OH MY GOODNESS! These are gorgeous!! How fun….thanks for sharing. Now I want to know what editing you used to put the cool title in red at the bottom of the photo? 🙂
Ruthanne says
Photoshop, of course. 😉
Denise@TogetherWeSave says
So cute!! Now I wonder if I can make these!
Ruthanne says
Yes, you can! If I can do it, you can do it. 🙂
Angela @ Homegrown Mom says
I would love to surprise my girls with these! They would be so cute for a party, too.
Sandy says
WOW, you are amazing!!! I’ve made cake pops before but can’t make anything besides a ball shape!! These looks soo adorable and totally like a bubblegum machine!!!!
Life of a Doctor's Wife says
Those look fabulous! So cute and so fun.
Candi @ Family Stamping and FOOD! says
Those are so adorable!!! I love Bakerella’s site too. You are so ingenious!
Shayna says
These are adorable! Thanks for sharing the pictures – I’m intimidated (sad but true) by some of the more complicated bakerella (and that kind of awesome) recipes so this is great!
Ruthanne says
Yes, I feel intimidated by some of Bakerella’s recipes, too. I love to just read through her recipes and admire her pictures ~ even if I don’t end up making it.
Did you see her Sesame Street Cake Pops? They were so adorable!
Kellie says
They look too cute to eat! What a great idea.
pam says
I had not seen this one. I totally need to make these
melissa stover says
all your food is so beautiful.
Ruthanne says
You’re not biased, are you? 😉
Jenn @ Beautiful Calling says
These are soooo neat! I imagine my littles would go crazy for these!
Sherry says
Those are adorable! What fuN!
Erin says
Very cute. I bet Red Hots would work for the top of the machine instead of Dots
Ruthanne says
Red Hots would work great!
Tonya says
These look SO cute! Great for a birthday party.
Kathryn says
So cute! I thought when I first looked at the picture that you had used marshmallows for the bottoms. Now thinking about it, I don’t know how well the frosting would have stayed on, lol. Love your blog, and those cake pops look so cute, what a fun idea!
Phoebe @ GettingFreedom says
Pretty sure I would win Mother of The Year Award with these. 😉
Ruthanne says
Most definitely! 🙂
Kristen says
Those have got to be the most clever cake pops I have seen yet. SO fun!!!
Heather says
These are absolutely adorable! So creative 🙂
Netta says
ADORABLE!
Thank you for posting these!
I WILL be making them sometime in the near future!
Nikki says
These are so pretty and fun!
Kasey says
Super cute and creative!! I love Bakerella’s site and her cake pops. So far I have only made them as cake balls. They are a hit!
Marsha says
you are so talented and clever, ruthanne. and obviously not content with just reading about other people doing things. i love that about you.
TheHappyHousewife says
I agree! She is amazing, hoping some of it will rub off on me!
Ruthanne says
My head is growing.
It may not fit in the blogosphere much longer.
Jennifer says
Oh my goodness… these are adorable! And the photos are stunning… so vibrant!
Ruthanne says
Thank you, Jennifer!
Joni says
They turned out so cute. At our home we are in love with cake pops! What a great rendition! Joni
cindy says
so cute. very creative.
Mary @ Giving Up on Perfect says
I think these are adorable!!!
Rachel Lynn says
These are too cute, I love them!
Julie says
How fun, these are so cute!!!
GlowinGirl says
Hello! Marsha sent me over here because I tried cake balls with less than stellar results and blogged about it. Yours are fabulously cute! I’m not sure I can like you. 😉
I also saw your sweet shot picture at Darcy’s — beautfiul, beautiful girl you have, and what gorgeous pix. Too talented, you are! I’ll like you anyway.
Have a blessed day!
Kim says
how clever! Love those!
Kim @ http://frostmeblog.blogspot.com
party inspiration
Garnish says
Beyond brilliant! And since I firmly believe that you don’t need a special occasion to do something fun, think I’ll attempt just for the fun of it!
Garnish + Enjoy,
– Suzanne
Mary Williams says
These are breathtaking!! I featured them on my friday favorites!!
http://lilbitofus.blogspot.com/2010/04/friday-favorites_09.html
Melanie Wyrick says
These are adorable! I may make these for my three year olds Bubble gum birthday party. Do you think you could freeze these or freeze at certain steps of the process?
Carli -DimplePrints says
These are darling!! I will be putting together a bubble gum party inspiration board, do you mind if I include these (I will link back to your site)? Thanks, Carli
TheHappyHousewife says
Yes, feel free to include them!
Thanks for asking.
Toni
Kim says
I featured these today as party of a candy inspiration board! They are so cute!
hugs ! Kim @ http://frostmeblog.blogspot.com
party inspiration
Norma Ruiz says
I just saw these and WOW they are so cute and andorable. gonna make them this weekend – Birthday pary.